Exposing Ports in Kubernetes: What You Should to Know
- z4ck404
- Aws , Eks , Kubernetes
- August 30, 2024
Table of Contents
Kubernetes is a popular tool for managing containerized applications. However, there are a few misunderstandings about how it works. One of the most common misconceptions concerns port exposure in Kubernetes pods. This article explains the truth about port exposure in Kubernetes.
The Misconception
Like many newcomers to Kubernetes, I initially thought that only the ports specified in the pod manifest would be exposed and accessible. The ports field in the YAML file seemed to be a natural place to define which ports were to be opened, in the same way that a traditional firewall is configured. This assumption led me to believe that any port not explicitly declared would be closed and unreachable.
This misconception is understandable. After all, in many other systems, explicitly defining open ports is a common security practice. However, for Kubernetes things are different.
2 — How Kubernetes Networking Really Works
To understand port exposure in Kubernetes, we first need to understand the
basics of the Kubernetes network. Kubernetes follows a flat network model in
which all pods can communicate with each other by default, regardless of which
node they’re running on. This is made possible by the Container Network
Interface (CNI), a plugin that sets up the network for containers.
In this model, each pod gets its own IP address within the cluster network.
This IP address is fully routable within the cluster, meaning that any pod can
reach any other pod using that IP address.
3 — The Truth About Port Exposure
Here’s the key point:
In Kubernetes, all ports are potentially accessible by default within the cluster network.
The ports field in pod or container manifests is primarily used for documentation and service discovery purposes. It doesn’t actually restrict or control network traffic to those ports.
This means that if a process in your container is listening on a port, that port is accessible from other pods in the cluster, whether or not you’ve specified it in your YAML manifest.
4 — Demonstrating the Behavior
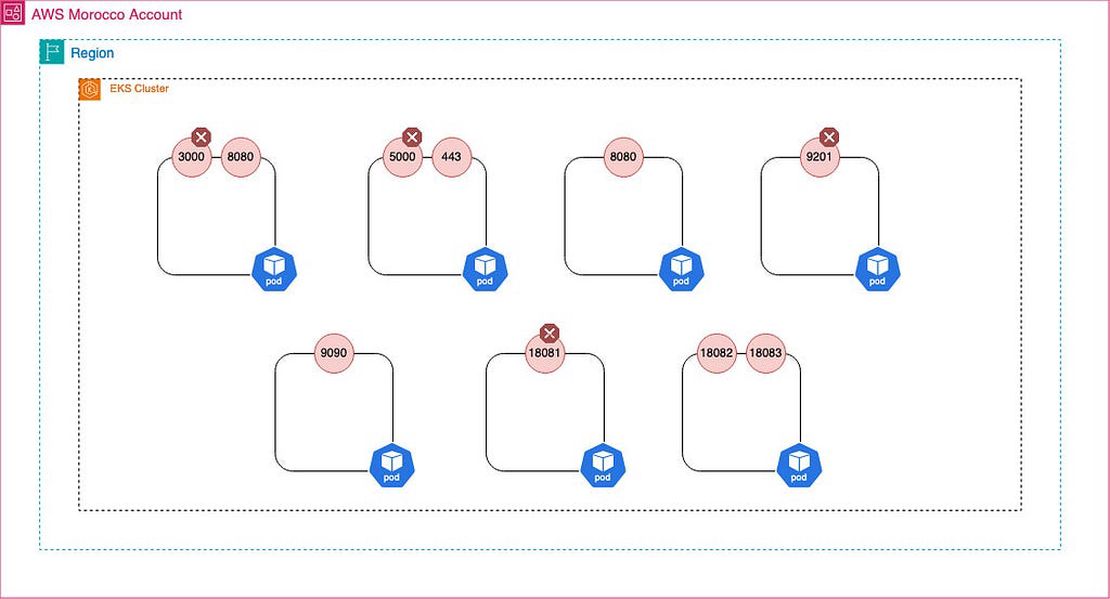
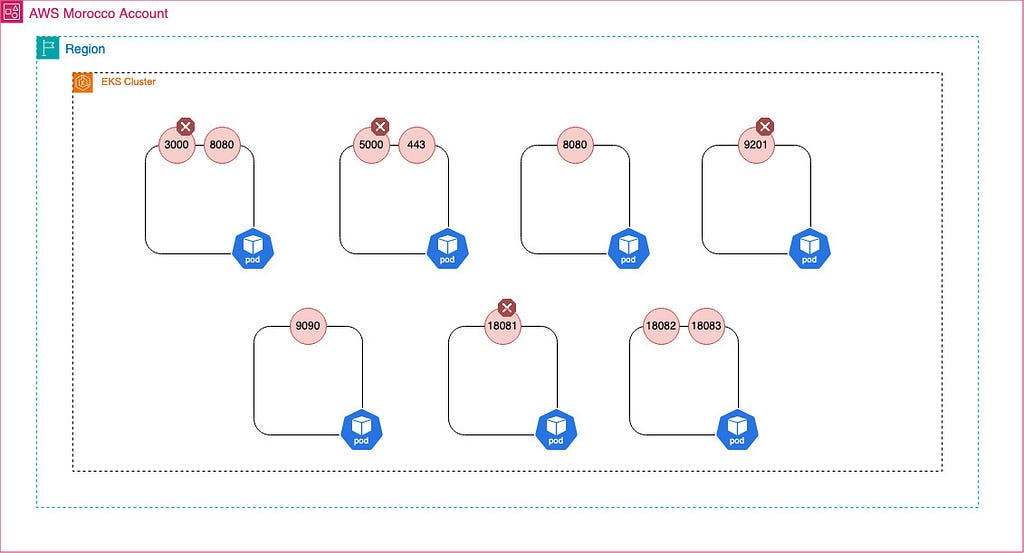
Let’s look at a practical example to illustrate this behavior : We will create a simple pod running a python application that listens on the ports 8080 , 9090 and 5000
   import http.server
   import socketserver
   from http.server import SimpleHTTPRequestHandler
   import threading

   class CustomHandler(SimpleHTTPRequestHandler):
       def do_GET(self):
           self.send_response(200)
           self.send_header('Content-type', 'text/plain')
           self.end_headers()
           response = f"Hello from port {self.server.server_address[1]}!"
           self.wfile.write(response.encode())

   def run_server(port):
       with socketserver.TCPServer(("", port), CustomHandler) as httpd:
           print(f"Serving on port {port}")
           httpd.serve_forever()

   if __name__ == "__main__":
       ports = [8080, 9090, 5000]
       threads = []
       for port in ports:
           thread = threading.Thread(target=run_server, args=(port,))
           threads.append(thread)
           thread.start()

       for thread in threads:
           thread.join()
Then we create the Dockerfile to package it:
    FROM python:3.9-slim

    WORKDIR /app

    COPY multi_ports.py .

    CMD ["python", "multi_ports.py"]
After that we build it and push it to a container registry where we can pull it later from our cluster — in this example a public AWS ECR — :
docker buildx build --platform linux/amd64,linux/arm64 -t public.ecr.aws/t1i1g9m6/multi-port-app:latest --push .
Then we create the deployment manifest and specify only the port 8080:
    apiVersion: apps/v1
    kind: Deployment
    metadata:
      name: multi-port-app
    spec:
      replicas: 1
      selector:
        matchLabels:
          app: multi-port-app
      template:
        metadata:
          labels:
            app: multi-port-app
        spec:
          containers:
          - name: multi-port-app
            image: public.ecr.aws/t1i1g9m6/multi-port-app
            ports:
            - containerPort: 8080
    ---
    apiVersion: v1
    kind: Service
    metadata:
      name: multi-port-app-service
    spec:
      selector:
        app: multi-port-app
      ports:
        - protocol: TCP
          port: 8080
          targetPort: 8080
And finally we deploy it:
kubectl apply -f kubernetes-ports-exposure/multi_ports_dep_svc.yaml
Once the pod is up and running, we can check the ports by running a curler pod:
kubectl run curler-pod --image=curlimages/curl --restart=Never -- sleep infinity
And see what ports the application pod is exposing:
kubectl exec -it curler-pod -- curl http://<pod-ip>:<port>
The output:

As you can see, the ports 9090 and 5000 are also open and listening, even though we only specified port 8080 in our manifest.
5 — Controlling Port Access
So, if the ports field doesn’t control access, how can we secure our
applications?
This is where Kubernetes Network Policies come into play.
Network Policies allow you to define rules that specify which pods can communicate with each other and on which ports. They act as a firewall for your pods, giving you fine-grained control over your cluster’s network traffic.
 https://ahmet.im/blog/kubernetes-network-policy/
Here’s a simple example of a Network Policy that only allows incoming traffic on port 8080 for the previous application :
    apiVersion: networking.k8s.io/v1
    kind: NetworkPolicy
    metadata:
      name: allow-only-8080
    spec:
      podSelector:
        matchLabels:
          app: multi-port-app
      policyTypes:
      - Ingress
      ingress:
      - from:
        - podSelector: {}
        ports:
        - protocol: TCP
          port: 8080
This policy would allow incoming connections to port 8080 from any pod in the same namespace, while blocking connections to all other ports.
6 — Best Practices
Given this behavior, here are some best practices to keep in mind:
1. Don’t rely on port specifications for security : Remember that the
ports field in your pod specs is for documentation and service discovery,
not access control.
2. Use Network Policies : Implement Network Policies to explicitly define allowed traffic flows (You can refer to this article to getstarted with network polices and check this repository to find some example recipes for Kubernetes Network Policies that you can just copy paste).
3. Follow the principle of least privilege : Only open the ports that are necessary for your application to function.
4. Regularly audit your cluster : Use tools to scan for unexpectedly open ports or misconfigurations.
5. Be mindful of your base images : Understand what processes and ports are active in your container images.
Conclusion
Understanding how port exposure really works in Kubernetes is crucial for properly securing your applications. While it may seem counterintuitive at first, this behavior allows for flexible and powerful networking configurations.
ℹ️ Code samples can be found here https://github.com/Z4ck404/aws-morocco-samples/tree/main/kubernetes-ports-exposure
Exposing Ports in Kubernetes: What You Should toKnow was originally published in AWSMorocco on Medium, where people are continuing the conversation by highlighting and responding to this story.